Showing posts with label Java. Show all posts

Wednesday, May 11, 2016

Enum and Property file cooperation in Java

Short reminder how to populate Enum in Java with values from property file.

1. Create an Enum as described in example below:

 public enum Users {  
   USER_1, USER_2;  
   private static final String PATH = "/selenium/environment/users.properties";  
   private static Properties properties;  
   private String value;  
   private void init() {  
     if (properties == null) {  
       properties = new Properties();  
       try {  
         properties.load(Users.class.getResourceAsStream(PATH));  
       }  
       catch (Exception e) {  
         e.printStackTrace();  
       }  
     }  
     value = (String) properties.get(this.toString());  
   }  
   public String getValue() {  
     if (value == null) {  
       init();  
     }  
     return value;  
   }  
 }  

Of course it's not an ideal solution and You may come up with better one but this works for me as expected and that's all I need.

2. Create a properties file (short reminder - this file should be placed into resources folder in Your project)

 USER_1=secretlogin1  
 USER_2=secretlogin2  

in this case we have just two entries but You can expand that.

3. Call that from code

 journey.login(Users.USER_1);  

Well it's pretty much it and hopefully this will save me from "googling" next time I'll need such code.

Monday, March 28, 2016

Use Multiple Java Versions In OSX

Really common question today is - "How I can install and use several Java versions on my OSX without a headache?", so here's my answer.

Just follow simple and straightforward steps below (yes I did check those before publishing):

1. Check if You already have java installed:

$ java -version

2. If You have java locally then check location of installed version:

- installed from Apple

/System/Library/Java/JavaVirtualMachines/1.X.X.jdk/Contents/Home/

- installed from Oracle

/Library/Java/JavaVirtualMachines/jdk1.X.X_XX.jdk/Contents/Home

Remember that path.

3. Check if You have homebrew installed if not install it first:

- http://brew.sh/

4. Install jenv with homebrew:

$ brew install jenv

5. Add information about jenv into Your .bash_profile or .bashrc file:

if which jenv > /dev/null; then eval "$(jenv init -)"; fi

6. Save and reload .bashrc / .bash_profile:

$ source .bashrc (.bash_profile)

7. Check that jenv works properly:

$ jenv versions

This command should have next output by default:

$ * system (set by /Users/ajones/.jenv/version)

8. Add Your installed local java to jenv:

$ sudo jenv add /Library/Java/JavaVirtualMachines/jdkX.X.X_XX.jdk/Contents/Home/

Check if this added with jenv versions command.

9. Install cask with homebrew:

$ brew install cask

10. Install latest java from Oracle:

$ brew cask install java

Currently (March 2016) this command installs jdk1.8.0_74.jdk from Oracle.

11. Add latest installed java into jenv as peviously:

$ sudo jenv add /Library/Java/JavaVirtualMachines/jdkX.X.X_XX.jdk/Contents/Home/

12. Run jenv versions and verify that now You have 2 java versions installed on Your local machine

13. If You want to switch to needed version run:

$ sudo jenv local oracle64-1.7.X.XX or
$ sudo jenv local oracle64-1.8.X.XX

14. After each command You can run:

$ java -version

in order to check which java version is currently active.

15. If You want to change java version to all users:

$ sudo jenv global oracle64-1.7.X.XX or
$ sudo jenv global oracle64-1.8.X.XX


You can install as many java versions as You want - just add them to the jenv and then simply do switch when needed.

Wednesday, October 14, 2015

Working with files in Java

Really obvious things for a lot of developers - but I still want to keep them here. You can blame me for not keeping them in mind - but I still don't have an answer what for :)

Reading from file:

public void readFile() {
        String str;
        try {
            File file = new File("Full path to file here");
            BufferedReader bufferedReader = new BufferedReader(new FileReader(file));

            while ((str = bufferedReader.readLine()) != null) {
                isTestHeaderString(str);
            }
            bufferedReader.close();
        } catch (IOException exception) {
            exception.toString();
        }
    }


Writing to file:

public void writeToFile() {
    try {
        new File("Path do directory if we need that").mkdir();
        File file = new File("Path & name for file");
        BufferedWriter writer = new BufferedWriter(new FileWriter(file));
        writer.append("What we actually want to write goes here");
        writer.close();
   } catch (IOException exception) {
        exception.toString();
   }
}

I'm not adding here any synchronisation / multi threading things - might add them later.


Sunday, October 11, 2015

Executing OSX terminal commands from Java

Couple days ago I've faced a situation when I needed to execute a pipeline of commands in OSX terminal from Java code and return result into program itself. You may say that there's a lot of information in the Internet (as a lot of us would say) but after spending some time it went out that those solutions are a bit incomplete for me :) So I'll add some information for those who might need that.

Problem:
- execute command in OSX terminal from Java program and return result from terminal back to the program;

Solution:

public static void main(String[] args) 
                             throws IOException, InterruptedException {
   try {
        Runtime runtime = Runtime.getRuntime();
        String[] cmd = {"/bin/bash", "-c", "Your command goes here"};

        Process process = runtime.exec(cmd);

        BufferedReader input = 
           new BufferedReader(new InputStreamReader(process.getInputStream()));

        String line;

        while ((line = input.readLine()) != null) {
                System.out.println(line);
        }

    } catch (Exception e) {
        System.out.println(e.toString());
        e.printStackTrace();
    }
}

And it's simply all. So You might want to create some kind of service class for that command creation and then simply pass it to runtime executor - it's up to You.

Before the end just one more important detail:

Problem:
- execute pipeline of commands (where we need to execute 2 or more) and only after that return a result back to the program

Solution:
- here I'll show an example of such pipeline:

"cd /Users/Projects/Test && git checkout master && git checkout -b master-test && git log"

So You can add as many of Your commands as You need just separate those with && and that will work.

That's probably all for that topic.

Sunday, January 18, 2015

Your First Test with Sikuli + Java + WebDriver + Maven in IntelliJIdea


It's Sunday so good time for something new and today we'll check out Sikuli, definitely not the newest solution but yet pretty handy and useful one. As usually we start as average user - from setting up environment till writing code in IDE and actually running that.

1. Installing Sikuli.

First we have open: http://www.sikuli.org/download.html - and download setup.jar on our PC. As suggested on screen below we have to save it in folder named SikuliX and run. If You're getting errors it means something wrong with Your java installation (which is needed) in this case I'd recommend You to look into steps I & III from: http://tech-memories.blogspot.com/2014/07/you-first-test-in-java-vs-testng-vs.html.


During first setup run You'll see same screens as below so simply choose needed options and click setup. 


2. Creating first Sikuli script with Sikuli IDE.

After finishing Sikuli installation let's create our project with Maven (it should be installed after step III from instructions above). What You need just open in console some folder in which Your project will be created and run next command: "mvn archetype:generate -DarchetypeGroupId=org.apache.maven.archetypes -DgroupId=com.testproject -DartifactId=FirstSikulliTest -DarchetypeArtifactId=maven-archetype-quickstart -DinteractiveMode=false" - that's it - Maven will create all what You'll need in future.
After that run siculi-ide.jar and save Your project in the same folder. After these two actions You should have same screen as one below. In case it's difficult - I'll add link for git repo with everything just ready for clone at the end of post.


This how main Sikuli window looks like during first run.


As for me Sikuli is pretty intuitive one and script creation process one of the easiest I ever seen. So You simply need to click on one option of the right panel, then Sikuli will prompt You to select area on the screen and will save a screenshot of needed element.


Here I'll just briefly describe test I've written (I won't go into details, because You can download that from repo, open in Sikuli and run by Your own).
Test Case:

- open firefox browser (You'll need to replace my firefox screens with Your own)
- go to allegro.pl (as always my favorite site for testing new tools)
- type in search bar - "laptop"
- choose sort by highest price
- choose first item
- add item to the bucket
- verify that Your bucket contains one item

As You can see test case is pretty straight forward but we don't need to create a complicated one to get familiar with Sikuli.


Once again - after replacing firefox screens save script and simply Run that.


You probably noticed and aware that such cases we can easily write in Java with WebDriver, by the way we can write our own code not just clicking in Sikuli itself using Jython (something like Java + Python). On the other side in real life there're several cases when WebDriver fails to solve our needs - and one of those - handling native system dialog windows, so here I'll show You how to combine WebDriver and Sikuli for such purpose.


3. Creating Java project with WebDriver + Sikuli combination.

Open IntelliJIDEA and import project(You should have that created from instructions described in previous step) as shown on screens below.


After importing project we have to open project settings and add "sikuli-java.jar" from installation folder to our classpath.


Now we can write a code. Again I won't explain all steps from code (cause it's on the repo as well) but I'll write a test steps for test scenario:

- open chrome browser (for browser start we're using WebDriver - so doesn't matter which You'll use, but don't forget to update needed screens for Sikuli)
- wait until pdf is loaded (I simply put delay here)
- press download button
- save book on desktop
- minimize all windows
- verify that book is saved to our desktop


As You can see process is pretty obvious and if something goes wrong - just try to check everything step by step from beginning (project definitely works for me) or just leave me a comment under post. Also You can look on Sikuli official page for more information (truly speaking their example doesn't work - or it's better to say doesn't described in the best way).

P.S. as promised github repo: https://github.com/operep/Sikulli_Test_Project.git . Enjoy!

Sunday, January 11, 2015

Your First Test with Galen + Java + TestNG

Today I'd like to introduce one interesting instrument for automation testing - Galen framework. Obviously it's probably not the most popular or the best one but I'm sure because of some special features it'll find it's own niche on the market.
No secret that we'll do everything from scratch, so let's try that out...

1. Galen installation

Simply go to http://galenframework.com/ and download zip with binaries on Your PC.


After downloading and extracting let's add that to the path variable just for future convenience.


After all preparations traditional check in console:


And that's all what we need for the start with first test.

2. Our first test with Galen.

Besides of Galen jar in the path variable we need spec file. So let's create one in our project (any folder You want) folder. To be honest till the end, some of next steps You can find on official Galen web page - I've just tried if that example really works. So let's create "home-page.spec" in Galen_Project folder. After creation just put the exact information from screen below and save that.


Now we need to try that test, so open console, go to the project folder and paste next command "galen check home-page.spec --url http://samples.galenframework.com/tutorial1/tutorial1.html --size 640x480 --htmlreport .", press Enter and see what happens. By default Galen uses Firefox browser and I didn't check other options (in any case later in ide during writing code You can choose any other browser). As You can see from screen below test fails and there's actually even information why, which is handy.


Let's modify a bit "home-page.spec" and try again.


Now it passes and if we'll check our project folder we can find a report which is built by Galen itself.


If we need to run several spec files we just put them all after check and before url.


Now in report we can see results for different spec files.


Looks pretty simple but lets put some more magic into it. I'm using IntelliJ IDEA (community which is free) so on the several slides below shown process of project creation.


As we don't use any of build tools here - we need to add Galen jar to build path of our project. Also if You don't have Your Selenium jar in the file path You should add that too.


Final project structure shown on next screen.


I won't be original about web page for our test it's going to be Allegro as usual (hopefully they won't be mad on me for that). So we need to create "allegro-home-page.spec" first and put some information about elements from original page. In my case I'll check header, input field for search  and main navigation menu. I won't describe details of that spec cause they're pretty straight forward but be sure that Galen could do much more, don't believe me? Check that out by Your own - http://galenframework.com/docs/reference-galen-spec-language-guide.


After spec file we're creating our test which is actually even more simple. So in our test file we just have to declare our Layout Report and after all checks pass it to the Report Builder which will generate report for us. Part of this code You can also find on official framework page. So lets run it.


After running we can open report which is in target/reports folder.


Galen creates simple but pretty attractive and informative report as for me. Here we can see all verification's we've done and in case of failure You'll see correct message related to that failed step.


I believe nothing to add for now beside of one short conclusion. This framework looks not really understandable from first time but it's still intuitive one so I didn't spend whole day for that. Also have to admit that we can't compare this instrument with WebDriver or another framework - but we can look on that from point of specific use - when we don't have our own matcher's for position or css checking. So no need to invent another bicycle - just add that to Your project and use where needed.

P.S. added project to the repo: https://github.com/operep/Galen_Test_Project.git, so You can simply clone that

Sunday, July 6, 2014

Your first test in Java + TestNG + WebDriver + Maven in Eclipse.


Actually today in internet we can find hundreds sources about setting up project in Eclipse vs Java vs WebDriver vs  TestNG and I bet this one won’t be pretty original but I’ll try to place it all together one more time.


Before we start I have to admit one important thing – for some situations we just need some other instruments thus WebDriver won’t solve all Your potential needs.


I. Java (Windows)


1) Check out if You have Java installed and configured already.

Firstly we have to check if we have Java installed in our system – so open Command Prompt and type “java -version” command then press Enter. If You didn’t see message I’m able to see on my computer You probably don’t have Java jdk installed on Your machine either it’s not configured in system variables. 

  
I’d recommend check it first. Usually Java places itself into the folder which is shown on the image.


If You have Java files there but still can’t successfully run command from 1) section – go directly to section 4) and follow all needed steps.
In other case proceed through all following steps from 2) to 4).


2) Downloading Java package from Oracle web service.

Just click the link, accept an agreement and choose needed version. Download should start in a second.


3) Installing Java.

I believe in a whole world there’re no so many of easy processes like installing Java. Simply open folder in which You’ve downloaded Java package and run it. After that simply click NEXT and Ok where needed.


4) Verifying or setting Java HOME folder as a System variable.

Here we can check if it’s already done by installer or do that by ourselves. So do Click with right mouse button on “My Computer” icon and choose “Properties”. Then click on “Advanced system settings”.


“Environment Variables” next.


Choose “Path” from the bottom window as shown on the screenshot and click “Edit


In the string of different variables You should see something like on screenshot otherwise You have to add that information here don’t forget to place semicolon where needed. After all You’re done with Java – go to the section 1) and try that command again but don’t forget to restart command prompt first.


II. Eclipse installing and setting it up.

Here we’ll do some steps which are needed for installing Eclipse and configuring it for our future testing needs.


1) If You have Eclipse already installed and configured in Your system, please skip this section, otherwise let’s start from downloading.

Simply click on the link - https://www.eclipse.org/downloads/
Follow instructions on screenshot – choose Your version of OS.


Here You’re proposed to choose mirror if You don’t like preferred one – You’re able to pick any other from the list on the page.


After downloading zip archive with Eclipse I’d recommend to move it in different folder on the disk and just extract it there. Eclipse doesn’t need any special installation – extract and You’re ready to go.


First time You’ll run Eclipse You’ll see next screen with empty line, I already have specified folder:


That means You have to choose folder on Your computer where Eclipse will store project files. Also You’ll have a chance to make this location as a default, otherwise You’ll need to confirm this step every Eclipse launch. 
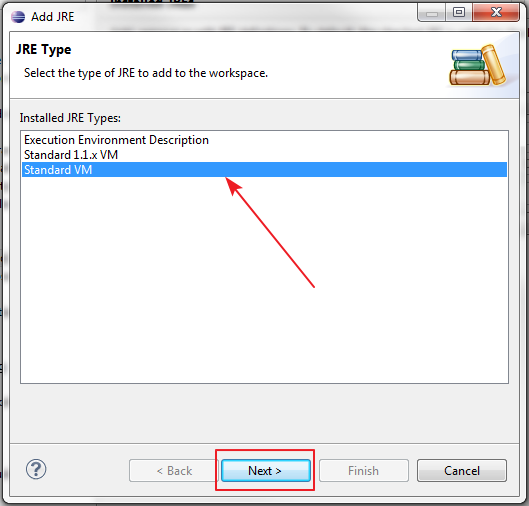
After starting Eclipse we have to check if it knows about our Java installed in the system. Go to “Window” menu Preferences” and follow steps on the screenshots below.


After all those steps You should have almost everything for Your first test. Just some more small things.


III. Maven downloading and setting up.


According Wikipedia – “Maven is a build automation tool used primarily for Java projects. Maven addresses two aspects of building software: First, it describes how software is built, and second, it describes its dependencies.


So we’ll use Maven for two purposes – first we’ll build simple project with that – which is much easier and faster and then we’ll let Maven to take care about our external libraries.


As usually – if You have that already done – just skip this section.


1) Download Maven is pretty simple – click on the link http://maven.apache.org/download.cgi. After page loaded choose one of the links from screenshot.


After downloading just like with Eclipse You need to extract Maven sources in the folder You’d like.


After extraction remember path to the Maven BIN folder – e.g. “C:\\Install\Maven\apache-maven-3.2.1\bin” and do all steps from 4) section in Java setting-up part of this topic.
When You’ll finish with that open Command Prompt and type “mvn -version” You should see same information as on screenshot below.


Great we’re almost done.
Just some more commands for work with Maven:
a) create project
- mvn archetype:generate
            -DarchetypeGroupId={archetype-group-id} – here Maven archetypes placed – org.apache.maven.archetypes
-DgroupId={project-packaging}  - here we specify relation to our project e.g – “com.testproject”
-DartifactId={project-name} – obviously here we specify project name e.g. – “FirstWebDriverTest”
-DarchetypeArtifactId=maven-archetype-quickstart – it’s already predefined project structure for us
-DinteractiveMode=false – we don’t need interactive mode during project creation
So according to this for create project we have to:
- open a folder where we want to place our project;
- open Command Prompt – make sure You’re in that folder;
- type – “mvn archetype:generate -DarchetypeGroupId=org.apache.maven.archetypes -DgroupId=com.testproject -DartifactId= FirstWebDriverTest -DarchetypeArtifactId=maven-archetype-quickstart -DinteractiveMode=false
- press Enter;
- on first prompt press Enter;
- Choose a number – press 5;
- Choose version – press 5;
- Confirm – Y and Enter. Done You just created Your first project. Next step will be importing that into Eclipse.

b) compile project – “mvn compile
c) run project tests = “mvn test
d) clean project = “mvn clean
e) package project into jar or war = “mvn package” or “mvn install
f) update dependencies = “mvn dependency:resolve

It’s pretty much of Maven commands which You’ll need for the beginning.
For more detailed information please refer to – http://maven.apache.org/.


IV Importing project into Eclipse.


Open Eclipse go to menu “File”------> “Import…”Choose the option as shown on screenshot and click Next button.


In the next window select root directory where You’ve created the project with Maven – just go to the Browse option and choose the necessary one then press Finish and we’re done.


For now You have to be able see the structure of Your project. The most attentive one already noticed that Maven created for us almost everything – e.g. project structure and even some sample files.


For completing setup we need to edit pom.xml file which You can find in the root directory of Your project – so go into that and add that code You can see on screens below <url> tag. For Your convenience I’ll past the code after images.


After dependencies block just put build block obviously it’ll work without that but if You would like to expand project a bit that will help You.


V. Selectors.

Selectors is not the point of this article thus I’ll give just short explanation – it’s an address of the needed element in DOM structure of HTML page. We can find an element in several different ways: by id, by class name, with XPath or with CSS selector. In dynamic world with dynamic pages of web sites most useful are last two ways: XPath & CSS. It’s up to You which one to use – one of the main differences between them is that: XPath has to read whole DOM structure while looking for element when CSS doesn’t.
Let’s simply start with them, for this example I’ll write both of them.
Before we start we’ll need a Firefox browser to be installed and two add-ons for Firefox: Firebug & Firepath. In case You don’t have them: go to Firefox main menu then click Add-ons and via search field look for those we need. 


After installing You’ll see small “Bug” button in the top right corner of Your Firefox browser


After clicking on that button in the bottom of screen You’ll see developers instruments with FirePath tab.


For example we’ll write test based on “allegro.pl” web site – that one has a lot of different elements so we’ll have a really big choice.
Let’s open allegro.pl in our Firefox browser and discover locator for main search field and for black search button next to that field on which we have to click for search.
Pretty simple way to do that is:
            - open the needed page;
            - open debugger tool by clicking on “Bug” button;
            - go to FirePath tab in debugger;
            - click on button with arrow (shown on first screenshot below);
            - click on needed element e.g. search field;
            - get the locator in the FirePath locator input field. 


In this case we have to expand this input form to get selector for the input field.


According to screens we’ll have:
            - XPath for search field - //*[@id=’main-search-text’] and for search button - //input[@class="sprite search-btn"];
            - CSS selector for search field - #main-search and for search button - .search-btn.
Now we have all needed information for our first test case.

More information about selectors:
            - http://www.w3schools.com/xpath/xpath_syntax.asp;
            - http://www.w3schools.com/cssref/css_selectors.asp.


VI. First test.

Open project in Eclipse, expand folder src/test/java and the right mouse click on package in my case com.testproject.
After clicking choose New -----> Class. Remember that class name should start from capital letter and if it contains more then one word should be written with CAMEL style.

Now if You’re point mouse on Your test class, press right button and choose option Run As ------> TestNG Test You should be able see how it’s running.
That’s pretty much for this article all additional things which connected to selectors or Java syntax You can explore by Yourself. I hope You’ll enjoy the power of automation testing.