Showing posts with label WebDriver. Show all posts

Wednesday, May 22, 2019

Selenium Grid + Docker + AWS EC2

This is going to be a simple (and single) entry point for setting up and running Selenium Grid inside of Docker containers on AWS EC2.

So steps will be the next:


1. Create and start EC2 instance
2. Open port 4444 as it’s used by the grid through the adding needed security rule:
    I. Open the Amazon EC2 console at https://console.aws.amazon.com/ec2/
    II. In the navigation pane, choose the Security Groups link. 
    III. Select the Inbound tab, choose Edit.
    IV. In the dialog, choose Add Rule and do the following:
        - Type: Custom TCP
        - Protocol: TCP
        - Part Range: 4444
        - Source: My IP
        - Description: Selenium Grid (or any other one)

Once the Selenium Grid is up and running, if 52.222.124.100 (for example) is the public facing IP address  connecting to http://52.222.124.100:4444/grid/console will connect to the console.

Login into and install Docker:

Install Docker on the AWS instance: 

$ sudo yum install -y docker

Start the docker service: 

$ sudo service docker start

Add the ec-2-user to the Docker group: 

$ sudo usermod -a -G docker ec2-user

Close the Mac Terminal and reopen it to reset permissions.


$ docker network create grid

$ docker run -d -p 4444:4444 --net grid --name selenium-hub selenium/hub:3.11.0-bismuth

$ docker run -d --net grid -e HUB_HOST=selenium-hub -v /dev/shm:/dev/shm selenium/node-chrome:3.11.0-bismuth

$ docker run -d --net grid -e HUB_HOST=selenium-hub -v /dev/shm:/dev/shm selenium/node-firefox:3.11.0-bismuth

With docker-compose file it will be easier.

Install docker-compose:

$ sudo curl -L https://github.com/docker/compose/releases/download/1.20.1/docker-compose-'uname -s'-'uname -m' -o /usr/local/bin/docker-compose

$ sudo chmod +x /usr/local/bin/docker-compose

In home directory (directory from where You’re starting grid):

$ touch docker-compose.yaml

Paste next content (example from SeleniumHQ)
---------------------------------------------------------------------------

# To execute this docker-compose yml file use docker-compose -f <file_name> up  
 # Add the "-d" flag at the end for deattached execution  
 version: '2'  
 services:  
  firefox:  
   image: selenium/node-firefox:3.11.0-bismuth  
   volumes:  
    - /dev/shm:/dev/shm  
   depends_on:  
    - hub  
   environment:  
    HUB_HOST: hub  
   
  chrome:  
   image: selenium/node-chrome:3.11.0-bismuth  
   volumes:  
    - /dev/shm:/dev/shm  
   depends_on:  
    - hub  
   environment:  
    HUB_HOST: hub  
   
  hub:  
   image: selenium/hub:3.11.0-bismuth  
   ports:  
    - "4444:4444"  

---------------------------------------------------------------------------

$ docker-compose up -d - to start grid

$ docker-compose down - to stop grid


If needed more than 1 node either for Chrome or Firefox just add the entry into docker-compose file.

Example of usage will be something like that from Your selenium setup (for Jenkins it can be done separately):

@BeforeMethod(alwaysRun = true)
public void setupBaseTest() throws Exception {
    DesiredCapabilities dr = null;
    dr = DesiredCapabilities.chrome();
    driver = new RemoteWebDriver(new URL("http://52.222.124.100:4444/grid/console"), dr);
}

Sunday, January 18, 2015

Your First Test with Sikuli + Java + WebDriver + Maven in IntelliJIdea


It's Sunday so good time for something new and today we'll check out Sikuli, definitely not the newest solution but yet pretty handy and useful one. As usually we start as average user - from setting up environment till writing code in IDE and actually running that.

1. Installing Sikuli.

First we have open: http://www.sikuli.org/download.html - and download setup.jar on our PC. As suggested on screen below we have to save it in folder named SikuliX and run. If You're getting errors it means something wrong with Your java installation (which is needed) in this case I'd recommend You to look into steps I & III from: http://tech-memories.blogspot.com/2014/07/you-first-test-in-java-vs-testng-vs.html.


During first setup run You'll see same screens as below so simply choose needed options and click setup. 


2. Creating first Sikuli script with Sikuli IDE.

After finishing Sikuli installation let's create our project with Maven (it should be installed after step III from instructions above). What You need just open in console some folder in which Your project will be created and run next command: "mvn archetype:generate -DarchetypeGroupId=org.apache.maven.archetypes -DgroupId=com.testproject -DartifactId=FirstSikulliTest -DarchetypeArtifactId=maven-archetype-quickstart -DinteractiveMode=false" - that's it - Maven will create all what You'll need in future.
After that run siculi-ide.jar and save Your project in the same folder. After these two actions You should have same screen as one below. In case it's difficult - I'll add link for git repo with everything just ready for clone at the end of post.


This how main Sikuli window looks like during first run.


As for me Sikuli is pretty intuitive one and script creation process one of the easiest I ever seen. So You simply need to click on one option of the right panel, then Sikuli will prompt You to select area on the screen and will save a screenshot of needed element.


Here I'll just briefly describe test I've written (I won't go into details, because You can download that from repo, open in Sikuli and run by Your own).
Test Case:

- open firefox browser (You'll need to replace my firefox screens with Your own)
- go to allegro.pl (as always my favorite site for testing new tools)
- type in search bar - "laptop"
- choose sort by highest price
- choose first item
- add item to the bucket
- verify that Your bucket contains one item

As You can see test case is pretty straight forward but we don't need to create a complicated one to get familiar with Sikuli.


Once again - after replacing firefox screens save script and simply Run that.


You probably noticed and aware that such cases we can easily write in Java with WebDriver, by the way we can write our own code not just clicking in Sikuli itself using Jython (something like Java + Python). On the other side in real life there're several cases when WebDriver fails to solve our needs - and one of those - handling native system dialog windows, so here I'll show You how to combine WebDriver and Sikuli for such purpose.


3. Creating Java project with WebDriver + Sikuli combination.

Open IntelliJIDEA and import project(You should have that created from instructions described in previous step) as shown on screens below.


After importing project we have to open project settings and add "sikuli-java.jar" from installation folder to our classpath.


Now we can write a code. Again I won't explain all steps from code (cause it's on the repo as well) but I'll write a test steps for test scenario:

- open chrome browser (for browser start we're using WebDriver - so doesn't matter which You'll use, but don't forget to update needed screens for Sikuli)
- wait until pdf is loaded (I simply put delay here)
- press download button
- save book on desktop
- minimize all windows
- verify that book is saved to our desktop


As You can see process is pretty obvious and if something goes wrong - just try to check everything step by step from beginning (project definitely works for me) or just leave me a comment under post. Also You can look on Sikuli official page for more information (truly speaking their example doesn't work - or it's better to say doesn't described in the best way).

P.S. as promised github repo: https://github.com/operep/Sikulli_Test_Project.git . Enjoy!

Sunday, January 11, 2015

Your First Test with Galen + Java + TestNG

Today I'd like to introduce one interesting instrument for automation testing - Galen framework. Obviously it's probably not the most popular or the best one but I'm sure because of some special features it'll find it's own niche on the market.
No secret that we'll do everything from scratch, so let's try that out...

1. Galen installation

Simply go to http://galenframework.com/ and download zip with binaries on Your PC.


After downloading and extracting let's add that to the path variable just for future convenience.


After all preparations traditional check in console:


And that's all what we need for the start with first test.

2. Our first test with Galen.

Besides of Galen jar in the path variable we need spec file. So let's create one in our project (any folder You want) folder. To be honest till the end, some of next steps You can find on official Galen web page - I've just tried if that example really works. So let's create "home-page.spec" in Galen_Project folder. After creation just put the exact information from screen below and save that.


Now we need to try that test, so open console, go to the project folder and paste next command "galen check home-page.spec --url http://samples.galenframework.com/tutorial1/tutorial1.html --size 640x480 --htmlreport .", press Enter and see what happens. By default Galen uses Firefox browser and I didn't check other options (in any case later in ide during writing code You can choose any other browser). As You can see from screen below test fails and there's actually even information why, which is handy.


Let's modify a bit "home-page.spec" and try again.


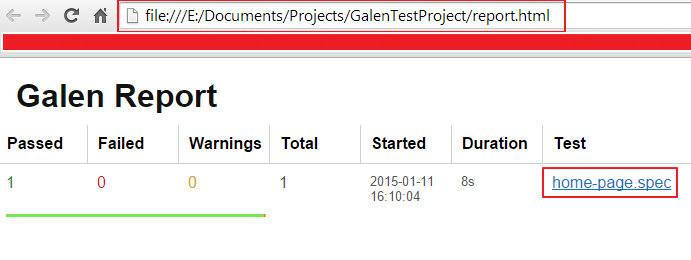
Now it passes and if we'll check our project folder we can find a report which is built by Galen itself.


If we need to run several spec files we just put them all after check and before url.


Now in report we can see results for different spec files.


Looks pretty simple but lets put some more magic into it. I'm using IntelliJ IDEA (community which is free) so on the several slides below shown process of project creation.


As we don't use any of build tools here - we need to add Galen jar to build path of our project. Also if You don't have Your Selenium jar in the file path You should add that too.


Final project structure shown on next screen.


I won't be original about web page for our test it's going to be Allegro as usual (hopefully they won't be mad on me for that). So we need to create "allegro-home-page.spec" first and put some information about elements from original page. In my case I'll check header, input field for search  and main navigation menu. I won't describe details of that spec cause they're pretty straight forward but be sure that Galen could do much more, don't believe me? Check that out by Your own - http://galenframework.com/docs/reference-galen-spec-language-guide.


After spec file we're creating our test which is actually even more simple. So in our test file we just have to declare our Layout Report and after all checks pass it to the Report Builder which will generate report for us. Part of this code You can also find on official framework page. So lets run it.


After running we can open report which is in target/reports folder.


Galen creates simple but pretty attractive and informative report as for me. Here we can see all verification's we've done and in case of failure You'll see correct message related to that failed step.


I believe nothing to add for now beside of one short conclusion. This framework looks not really understandable from first time but it's still intuitive one so I didn't spend whole day for that. Also have to admit that we can't compare this instrument with WebDriver or another framework - but we can look on that from point of specific use - when we don't have our own matcher's for position or css checking. So no need to invent another bicycle - just add that to Your project and use where needed.

P.S. added project to the repo: https://github.com/operep/Galen_Test_Project.git, so You can simply clone that

Tuesday, November 11, 2014

Your first test with Python + WebDriver + PyCharm

Today I’d like You to try Python for Your functional Web tests. Why Python? Because I believe it’s much easier to start with if we’ll compare with Java or .Net and also in several cases Python (because it’s scripting language) can do much more things than even Java (with all cross platform functionality itself).
So let’s do everything from the scratch. Next screens and instructions are for Windows users because I’m sure that install and run Python on OSX or Linux is much easier and doesn’t need any specific explanations.

1. Install Python.

For this we’re going to https://www.python.org/downloads/ and download needed package.


As You can see that we’re able to download Windows installer and install Python without any problems – I did it in default directory, also have to underline that I’ll use Python 3.4.2 for this example. 


After installation we’ll need to create local variable PYTHON_HOME (which is really not mandatory, but will be useful) and check if Python added to the main Path. For that just follow screens below one by one.


If everything correct we have to able to see next screen after running command “python --version” in our command prompt.


And this is pretty much all for Python installation.

2. Selenium installation.

Here will be also pretty much straightforward process with adding Python language bindings for WebDriver. For Python we don’t need to download different browser drivers as we did for Java.
First open https://pypi.python.org/pypi/selenium – and download archive with selenium (see screen below). After downloading extract somewhere on the disk. Next go to Your Python folder e.g. “C:\Python34” and run command (in command line prompt) – “pip install –U selenium”. 


 After this command Python should install Selenium but I faced one issue during this installation and for that we need our extracted Selenium archive – You have to copy extracted folder “selenium” (with all files in it) to “C:\Python34\Lib” (see screen below). 


One more step – we have to ensure that “selenium” is also in the path variable (scree below).


We’re almost ready, actually we’re ready for writing and running scripts in Python. As I mentioned before Python scripting language so it doesn’t need any specific IDE or anything like that – we can use simple notepad for testing. But for future convenience I’d recommend You install PyCharm from JetBrains.

3. Installing PyCharm

I believe one really easy step – go to https://www.jetbrains.com/pycharm/download/ and download community edition, which totally free and provides all necessary functionality. For those who use IntelliJ Idea already – You just need to add Python language plugin and then create new Python project (also pretty simple)


After downloading and installing PyCharm we’re all set, so we have just one more step – actual test writing and running.

4. Writing and running first test.

On first two screens we’re creating new project in PyCharm – pretty straight forward process.


Then we have to check our settings for ensure our PyCharm will use needed Python interpreter. So go : “File > Settings > Project interpreter” or press “Ctrl + Alt + S” and make sure that correct Python distributive selected also there should be “selenium” in the list of packages (see screen below).


Last step – create a “test” package in project root directory and then Python file – e.g. “FirstWebDriverTest.py”.
Our test will do several simple steps:
    - Open browser (for this example I’ll use Chrome, but You can easily change that).
    - Navigate to http://www.allegro.pl.
    - Type in search box “Laptop”.
    - Press “Search” button.
    - Verify that first item from results list has “Laptop” in it’s title.


For Your convenience I’ll paste whole code below:

import unittest  
 from selenium import webdriver  
   
 class FirstWebDriverTest(unittest.TestCase):  
   
   def setUp(self):  
     self.driver = webdriver.Chrome()  
     self.driver.get("http://www.allegro.pl")  
     self.SEARCH_TEXT = "Laptop"  
     self.SEARCH_FIELD_ID = "//input[@id='main-search-text']"  
     self.SEARCH_BUTTON_ID = "//input[@class='search-btn']"  
     self.SEARCH_RESULT_ITEM_TITLE = "//article[@class='offer offer-brand']//h2//span"  
   
   def test_search_in_allegro_pl(self):  
     driver = self.driver  
   
     driver.find_element_by_xpath(self.SEARCH_FIELD_ID)\  
       .send_keys(self.SEARCH_TEXT)  
     search_button = driver.find_element_by_xpath(self.SEARCH_BUTTON_ID)  
     search_button.submit()  
   
     driver.implicitly_wait(5000)  
     result = driver.find_elements_by_xpath(self.SEARCH_RESULT_ITEM_TITLE)\  
       .__getitem__(0)\  
       .__getattribute__("text")  
     self.assertIn(self.SEARCH_TEXT, result)  
   
   def tearDown(self):  
     self.driver.close()  


If You’ll do copy and paste from this page make sure that after inserting code has original formatting (You can refer to screen above) because for Python it’s extremely important.
So now we can run our test – “Run > Run” or “Alt + Shift + F10
Also You can do it through command prompt line (see screen below)


Hope this will be easy for You to start writing tests in Python and You’ll check how actually powerful this language is. One last thing – for this example with all downloading and installing steps I’ve spent about one hour (actually I’ve spent more for doing screens and describing steps :) ).

P.S. added project to repo: https://github.com/operep/Python_Test_Project.git, so now You'll be able simply clone that