Actually today in internet we can find hundreds
sources about setting up project in Eclipse vs Java vs WebDriver vs TestNG and I bet this one won’t be pretty
original but I’ll try to place it all together one more time.
Before we start I have to admit one important thing –
for some situations we just need some other instruments thus WebDriver won’t
solve all Your potential needs.
I. Java
(Windows)
1) Check out
if You have Java installed and configured already.
Firstly we have to check if we have Java installed in
our system – so open Command Prompt and type “java -version” command then press Enter. If You didn’t see message I’m able to see on my computer You
probably don’t have Java jdk installed on Your machine either it’s not
configured in system variables.
I’d recommend check it first. Usually Java places
itself into the folder which is shown on the image.
If You have Java files there but still can’t
successfully run command from 1)
section – go directly to section 4)
and follow all needed steps.
In other case proceed through all following
steps from 2) to 4).
2) Downloading Java package from Oracle web service.
Just click the link, accept an agreement and choose
needed version. Download should start in a second.
3) Installing Java.
I believe in a whole world there’re no so many of easy
processes like installing Java. Simply open folder in which You’ve downloaded
Java package and run it. After that simply click NEXT and Ok where needed.
4) Verifying or setting Java HOME folder as a System
variable.
Here we can check if it’s already done by installer or
do that by ourselves. So do Click with right mouse button on “My Computer” icon and choose “Properties”. Then click on “Advanced system settings”.
“Environment Variables” next.
Choose “Path”
from the bottom window as shown on the screenshot and click “Edit”
In the string of different variables You should see
something like on screenshot otherwise You have to add that information here
don’t forget to place semicolon where needed. After all You’re done with Java –
go to the section 1) and try that command again but don’t forget to restart
command prompt first.
II. Eclipse
installing and setting it up.
Here we’ll do some steps which are needed for
installing Eclipse and configuring it for our future testing needs.
1) If You have Eclipse already installed and
configured in Your system, please skip this section, otherwise let’s start from
downloading.
Follow instructions on screenshot – choose Your
version of OS.
Here You’re proposed to choose mirror if You don’t
like preferred one – You’re able to pick any other from the list on the page.
After
downloading zip archive with Eclipse I’d recommend to move it in different
folder on the disk and just extract it there. Eclipse doesn’t need any special
installation – extract and You’re ready to go.
First time You’ll run Eclipse You’ll see next screen
with empty line, I already have specified folder:
That means You have to choose folder on Your computer
where Eclipse will store project files. Also You’ll have a chance to make this
location as a default, otherwise You’ll need to confirm this step every Eclipse
launch.
After starting Eclipse we have to check if it
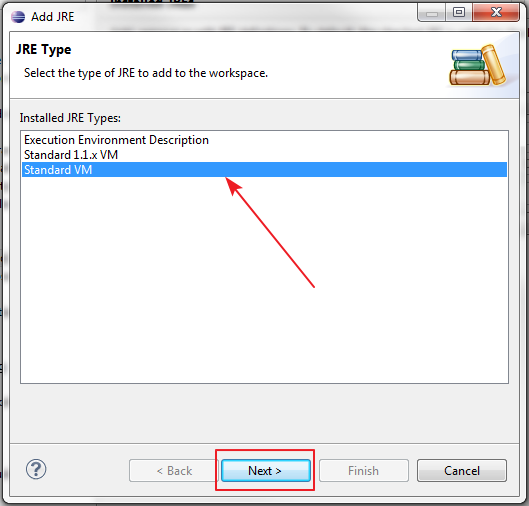
knows about our Java installed in the system. Go to “Window” menu “Preferences”
and follow steps on the screenshots below.
After all those steps You should have almost
everything for Your first test. Just some more small things.
III. Maven
downloading and setting up.
According
Wikipedia – “Maven is a build automation tool used primarily for Java projects. Maven addresses two aspects of building software: First, it
describes how software is built, and second, it describes its dependencies.”
So
we’ll use Maven for two purposes – first we’ll build simple project with that –
which is much easier and faster and then we’ll let Maven to take care about our
external libraries.
As
usually – if You have that already done – just skip this section.
After downloading just like with Eclipse You need to
extract Maven sources in the folder You’d like.
After extraction remember path to the Maven BIN folder
– e.g. “C:\\Install\Maven\apache-maven-3.2.1\bin” and do all steps from 4) section in Java setting-up part of
this topic.
When You’ll finish with that open Command Prompt
and type “mvn -version” You should
see same information as on screenshot below.
Great we’re almost done.
Just some more commands for work with Maven:
a)
create project
-
mvn archetype:generate
-DarchetypeGroupId={archetype-group-id}
– here Maven archetypes placed – org.apache.maven.archetypes
-DgroupId={project-packaging} - here we specify relation to our project e.g
– “com.testproject”
-DartifactId={project-name} – obviously here we specify
project name e.g. – “FirstWebDriverTest”
-DarchetypeArtifactId=maven-archetype-quickstart – it’s already
predefined project structure for us
-DinteractiveMode=false – we don’t need interactive mode during
project creation
So
according to this for create project we have to:
- open a folder where we want to place our project;
- open Command Prompt – make sure You’re in that folder;
- type – “mvn archetype:generate -DarchetypeGroupId=org.apache.maven.archetypes
-DgroupId=com.testproject -DartifactId= FirstWebDriverTest
-DarchetypeArtifactId=maven-archetype-quickstart -DinteractiveMode=false”
- press Enter;
- on first prompt press Enter;
- Choose a number – press 5;
- Choose version – press 5;
- Confirm – Y and Enter. Done You just created Your first project. Next
step will be importing that into Eclipse.
b)
compile project – “mvn compile”
c)
run project tests = “mvn test”
d)
clean project = “mvn clean”
e)
package project into jar or war = “mvn
package” or “mvn install”
f)
update dependencies = “mvn
dependency:resolve”
It’s
pretty much of Maven commands which You’ll need for the beginning.
For more detailed information please refer to – http://maven.apache.org/.
IV Importing
project into Eclipse.
Open Eclipse go to menu “File”------> “Import…”Choose
the option as shown on screenshot and click Next button.
In the next window select root directory where You’ve
created the project with Maven – just go to the Browse option and choose the
necessary one then press Finish and we’re done.
For now You have to be able see the structure of Your
project. The most attentive one already noticed that Maven created for us
almost everything – e.g. project structure and even some sample files.
For completing setup we need to edit pom.xml file which You can find in the
root directory of Your project – so go into that and add that code You can see
on screens below <url> tag. For Your convenience I’ll past the code after
images.
After dependencies block just put build block
obviously it’ll work without that but if You would like to expand project a bit
that will help You.
V. Selectors.
Selectors is not the point of this article thus I’ll
give just short explanation – it’s an address of the needed element in DOM
structure of HTML page. We can find an element in several different ways: by
id, by class name, with XPath or with CSS selector. In dynamic world with dynamic
pages of web sites most useful are last two ways: XPath & CSS. It’s up to
You which one to use – one of the main differences between them is that: XPath
has to read whole DOM structure while looking for element when CSS doesn’t.
Let’s simply start with them, for this example I’ll
write both of them.
Before we start we’ll need a Firefox browser to be installed and two add-ons for Firefox: Firebug & Firepath. In case You don’t have them: go to Firefox main menu then
click Add-ons and via search field
look for those we need.
After installing You’ll see small “Bug” button in the top right corner of
Your Firefox browser
After clicking on that button in the bottom of screen
You’ll see developers instruments with FirePath
tab.
For example we’ll write test based on “allegro.pl” web site – that one has a
lot of different elements so we’ll have a really big choice.
Let’s open allegro.pl in our Firefox browser and discover locator for main search field and for
black search button next to that field on which we have to click for search.
Pretty simple way to do that is:
-
open the needed page;
-
open debugger tool by clicking on “Bug”
button;
- go
to FirePath tab in debugger;
-
click on button with arrow (shown on first screenshot below);
-
click on needed element e.g. search field;
-
get the locator in the FirePath
locator input field.
In this case we have to expand this input form to get
selector for the input field.
According to screens we’ll have:
-
XPath for search field - //*[@id=’main-search-text’]
and for search button - //input[@class="sprite
search-btn"];
- CSS
selector for search field - #main-search
and for search button - .search-btn.
Now we have all needed information for our first test
case.
More information about selectors:
- http://www.w3schools.com/xpath/xpath_syntax.asp;
-
http://www.w3schools.com/cssref/css_selectors.asp.
VI. First
test.
Open project in Eclipse, expand folder src/test/java
and the right mouse click on package in my case com.testproject.
After clicking choose New -----> Class.
Remember that class name should start from capital letter and if it contains
more then one word should be written with CAMEL
style.
Now if You’re point mouse on Your test class, press
right button and choose option Run As
------> TestNG Test You should be
able see how it’s running.
That’s pretty much for this article all additional
things which connected to selectors or Java syntax You can explore by Yourself.
I hope You’ll enjoy the power of automation testing.